Author:


When WSL (Windows Subsystem for Linux) was first introduced to
the scene I was so excited to use it, because it marked a big leap forward in building
out the Windows Developer Experience, and as the second revision of it hit the PCs, it
introduced big performance improvements and it made sense to switch some of my
development to Windows.
In the age of cloud computing, containers, orchestration, resources someone's PC has can brake the development experience and with WSL the resources by default are unlimited, that means that WSL can take all of your CPU & RAM with Windows.
While running Docker Desktop and two containers that are literally don't do anything, one of them is a postgres instance and the other a simple fastapi that returns Hello World I get over 5 GB of RAM usage, scale that up to something that has business logic and more containers, and you won't be able to open Chrome.
 RAM usage of WSL when running two simple containers and Docker
Desktop
The solution to this problem is to create a .wslconfig file where we will define the amount of resources WSL can use.
The solution will consist of configuring the RAM usage, the maximum capacity it can use, the CPU cores and the SWAP memory over all of theses we will go in detail and why you would or wouldn't allow WSL to take up these resources.
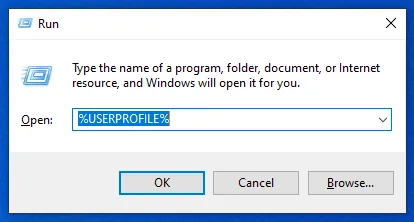
To configure resources we need to locate the .wslconfig file which will be located inside of the %USERPROFILE%. The easiest way to locate that folder is to open Run and type in %USERPROFILE%.

Once there, check if the file .wslconfig exists; if it doesn't - create it and it should look like the one in the picture below:

The caveat here with configuring the resources is that you need to keep in mind that you are running two systems in parallel, and that each one of them has to have resources, and that both of them will have their spikes in load - depending of the usage.
For example: I use WSL for development, where I need to use Docker which is heavy on RAM and CPU; and Windows for web browsing, entertainment, writing articles and playing video games.
This configuration applies to WSL2, so make sure you have that version, because it is more powerful then WSL1.
Now if the file was not created, add the following line on top of the file:
[wsl2]
To configure how much CPU cores WSL will use, you can add the variable:
processors=6
This tells WSL that it has 6 cores allocated to work with. Based on your CPU and Workloads you can allocate more or less. Keep in mind that WSL won't go over the defined limit here, so once it peeks at a certain point you can adjust the resources again.
To configure how much RAM you allocate to WSL you add the following line:
memory=8GB
This will tell WSL not to go over 8 GB of RAM. While configuring RAM, you need to keep in mind that RAM can be utilized fairly quickly, and this connects us to the next variable: that we will define Swap.
Swap comes in place when the whole RAM is utilized, then the system uses the secondary memory to keep the data of running applications instead of RAM, because it is full.
Depending on the load that you will carry out, you can allocate more or less, but I usually know that my current Kubernetes cluster will peek at 22 GB of RAM usage, and with that, I like to configure my swap 2 x 8, which means I will have 8 GB of RAM x 2, my swap will be 16 GB, which leaves room for the application to use more, but not to slow down.
swap=16GB
I came across situations where I didn't want WSL to use Swap memory:
After we did all of this work you file should look something like this:
    [wsl2]

    memory=8GB

    swap=16GB

    processors=4
Save this, and go into your PowerShell session and shutdown WSL:
wsl --shutdown
After this run WSL with your favourite distro, and the resources won't go over the limits that you have defined.
Author:
