Author:

Improve the development, modularity, and performance of your Angular apps.

The beauty of Angular architecture lies in splitting the codebase.
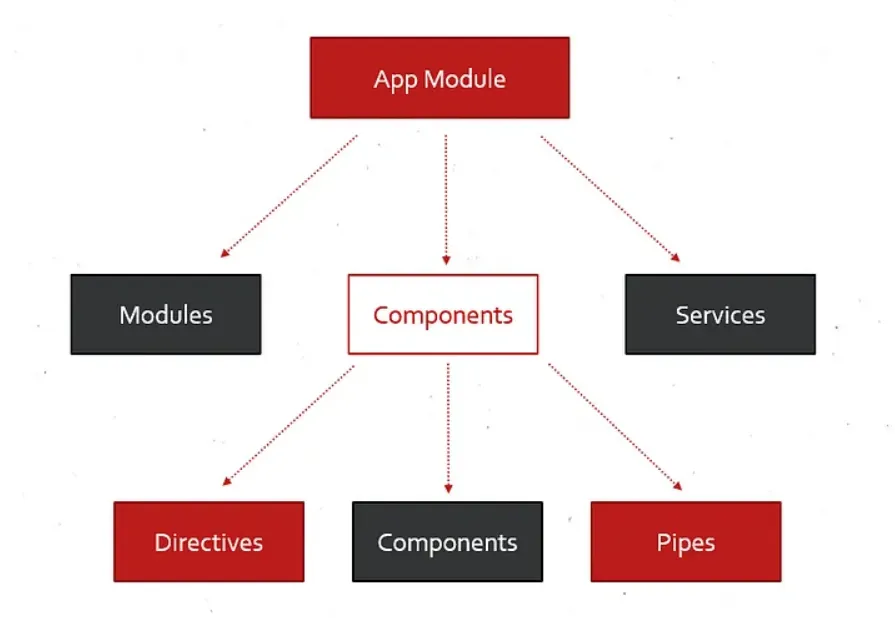
This separation respects a single-responsibility principle and results in a cleaner codebase.
Avoid importing all the components, directives, and services in your main module.

Instead, split functionalities per module (feature modules). As you import only the parts related to your feature within it, the modules will remain smaller and code cleaner.
This can be used in conjunction with the Router to enable Lazy Loading.
const routes: Routes = [
  {
    path: 'home',
    component: HomeComponent,
  },
  {
    path: 'todos',
    // lazy loaded route
    loadChildren: () => import('./Todos.module').then(m => m.TodosModule),
  },
]
In this example, The Todos module and its dependencies will be loaded only after landing on the specified route. The fewer dependencies used in the main module, the faster your app will load.
Angular CLI is a built-in tool that speeds up app development by allowing you to generate application parts and wire up dependencies automatically.
To kick things off, you can generate a new Angular application using:
ng new my-app
Instead of manually creating files in your codebase, use the CLI:
ng g c component-name
ng g s service-name
ng g p pipe-name
and similar.
The CLI also allows you to install packages that belong to the Angular standard library For example:
ng add @angular/material
Instead of reinventing the wheel, using native JavaScript APIs like Document, Fetch, or performing manual form validations - use the tools that are built into the framework.
Angular comes with a host of features for development.
Let's say you need to transform a value in a template. Naturally, you'd create a function in the component TypeScript file and do something like:
<h2>{{ doSomething(someFormValue) }}</h2>
This will work, but it is very bad for performance as the function will be called repeatedly on every re-render.
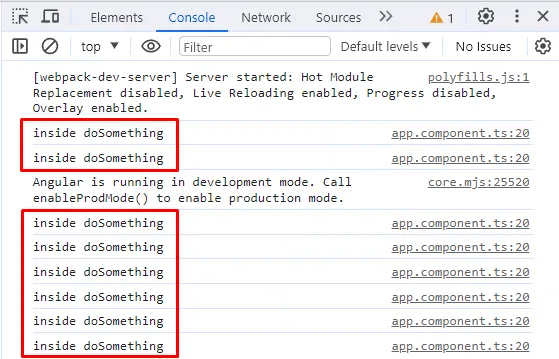
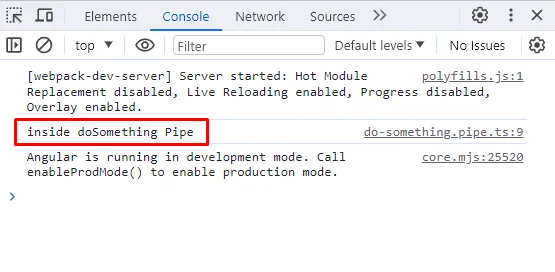
In these scenarios, you should use Pipes. Upon generating a pipe,
ng g pipe doSomething
@Pipe({
    name: 'doSomething'
  })
  export class DoSomethingPipe implements PipeTransform {

    transform(value: unknown, ...args: unknown[]): unknown {
      // perform some transformations
      console.log('inside doSomething Pipe');
      return 'transformed-data'
   }

  }
Apply it in the template using the pipe ( | ) symbol.
<h2>{{ someFormValue | doSomething }}</h2>
Now you have the exact same functionality built via Pipe. The difference between the two approaches is immediately evident.
One of the most powerful features of Angular is a Dependency Injection. Instead of a component creating its own dependencies, e.g:
// creating instances manually
private service = new PostsService();
, they can be provided from the outside and injected via a constructor (or inject() function):
constructor(private readonly service: PostsService) { }
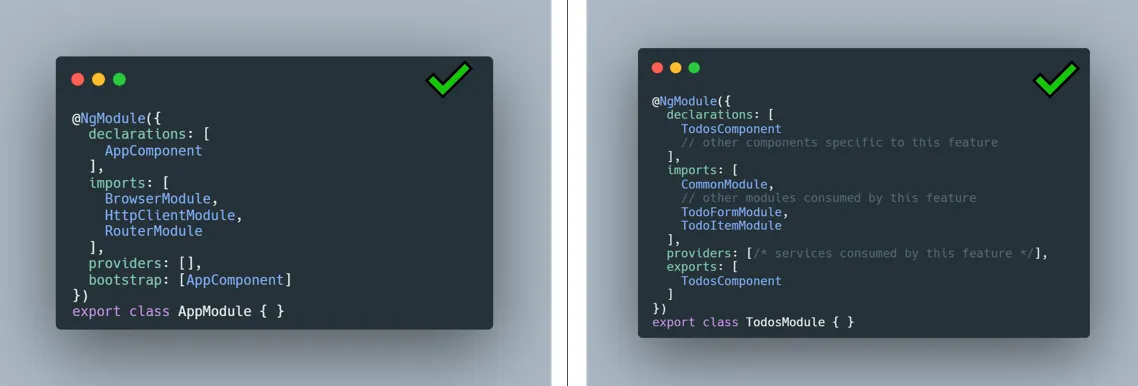
The underlying dependencies are registered in the modules as providers:
@NgModule({
  declarations: [
    AppComponent,
  ],
  imports: [
    BrowserModule,
    HttpClientModule
  ],
  providers: [PostsService], // <-- registering PostsService dependency
  bootstrap: [AppComponent]
})
export class AppModule { }
Services can also have a flag providedIn set that shows where it is provided. In this case, the service is provided in the root module by default, which eliminates the need for the service to appear in the providers array.
@Injectable({
  providedIn: 'root'
})
export class PostsService
With Dependency Injection in place, the Angular code is:
This is just the beginning of DI in Angular. If you'd like to learn more, I advise you to look up these topics:
The common practice is to use the Input and Output directives when sharing data between components. This is great when you have a parent-to-child or child-to-parent component relationship.
However, if you need to send data to a grandchild or grand-grandchild component or a sibling component, then it's going to be a lot of work. Not to mention if you have to update the data, you'll have to make changes in all places.
To avoid this you can make use of Rx.js Behavior Subject to build a centralized place to store data and for consumers to retrieve it.
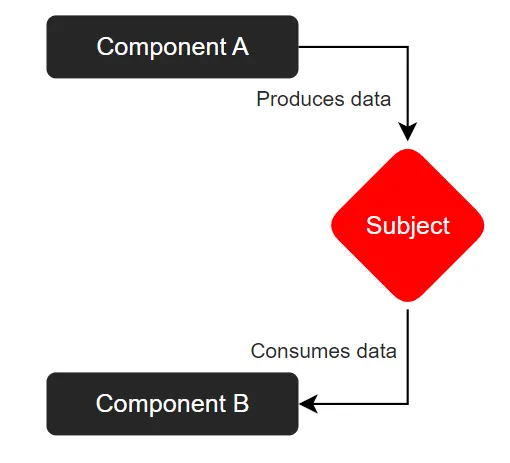
It all works on the Publisher-Subscriber pattern. One component pushes the data to the Subject, while the other consumes by subscribing to the Observable.
To see this in action create a new service and a Behavior Subject with a default count (1). It's a good practice to make this subject private to prevent it from being modified from the outside.
@Injectable({
  providedIn: 'root'
})
export class SharedDataService {

  private readonly currentCount$ = new BehaviorSubject<number>(1);

  public setCount(count: number): void {
    const currentValue = this.currentCount$.value;
    this.currentCount$.next(currentValue + count);
  }

  public getCount() {
    return this.currentCount$.asObservable();
  }

}
Using setCount() an outside component can change the current count. Using getCount() an outside component can retrieve the current count as Observable to subscribe to.
Inject the service and create two buttons that increase or decrease the count on click — basically call the same method with a different value.
<button (click)="increaseCount()">Count +1</button>

<button (click)="decreaseCount()">Count -1</button>
  constructor(private readonly service: SharedDataService) { }

  increaseCount() {
    this.service.setCount(1);
  }

  decreaseCount() {
    this.service.setCount(-1);
  }
Inject the same service, only this time call the getCount() method.
  constructor(private readonly service: SharedDataService) { }

  ngOnInit() {
    this.service.getCount()
    .subscribe(console.log)
  }
Now the two components can share data without being connected to each other.
Don't run from Rx.js. Make a good use of it.
It's a powerful tool with many adversities that work well with Angular.
You can map the response to your needs in the Observable pipe directly:
  titles!: string[];

  constructor(private readonly service: PostsService) { }

  ngOnInit() {
    this.service.getAllPosts()
    .pipe(
      map((data: Posts[]) => data.map(post => post.title))
    )
    .subscribe(data => this.titles = data)
  }
<div *ngFor="let title of titles">
    {{ title }}
</div>
Additionally, you can filter content based on criteria.
  ngOnInit() {
    this.service.getAllPosts()
    .pipe(
      map((data: Posts[]) => data.map(post => post.title)),
      filter((data: string[]) => data.length > 0)
    )
    .subscribe(data => this.titles = data)
  }
Sometimes you may want to consume the same Observable in multiple places. The Observables are designed to be cold in nature, meaning the Observable is recreated for each new subscriber.
In this example, the Observable is working with an API and each new subscriber will call the same API for its purposes.
    const postsData$ = this.service.getAllPosts();

    const firstSubscriber$ = postsData$;
    const secondSubscriber$ = postsData$;

    firstSubscriber$.subscribe(console.log);
    secondSubscriber$.subscribe(console.log);
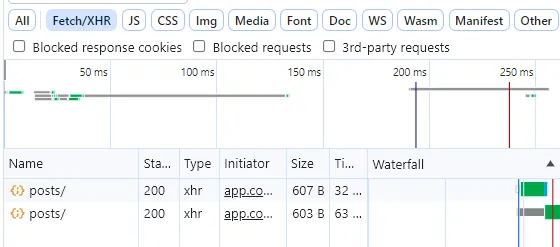 There are two network calls, one for each subscriber.
To fix this, convert this cold Observable into a hot one using the share() operator.
    const postsData$ = this.service.getAllPosts()
      .pipe(
        share()
      )

    const firstSubscriber$ = postsData$;
    const secondSubscriber$ = postsData$;

    firstSubscriber$.subscribe(console.log);
    secondSubscriber$.subscribe(console.log);
Now multiple subscribers will share the same Observable.
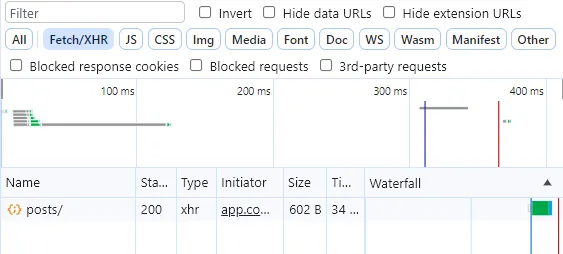 One network call for multiple subscribers
In order to consume the Observable data you need to subscribe to it. However, if you have one API that depends on another, does that mean that you need to subscribe twice? Let's find out.
  getCurrentUser(): Observable<User> {
    const user = {
      id: 1,
      name: 'Mirza',
      profession: 'DEV'
    };

    return of(user);
  }
This function will return a sample user. To combine it with the Posts service, a naive way would be to do something like this:
  myPost?: Posts;

  private getUserPost() {
    this.getCurrentUser()
    .subscribe((user: User) => {

      this.service.getAllPosts()
      .subscribe((posts: Posts[]) => {
        this.myPost = posts.find(post => post.userId === user.id);
      })

    })
  }
This will work, but it is a horribly bad practice.
In situations like these, you want to merge the two streams into one using operators
like mergeMap, switchMap, and
similar.
  private getUserPost() {
    this.getCurrentUser()
    .pipe(
      mergeMap((user) => this.service.getAllPosts()
      .pipe(
        map((posts: Posts[]) => posts.find(post => post.userId === user.id))
      ))
    )
    .subscribe((post?: Posts) => {
      this.myPost = post;
    })
  }
There are many more Rx.js operators with just as interesting use cases. I encourage you to go through the Rx.js docs and learn more.
An important detail that many new Angular developers miss is to unsubscribe from the Observables.
export class AppComponent implements OnInit {

  postsData!: Posts[];

  constructor(private readonly service: PostsService) { }

  ngOnInit() {
    this.service.getAllPosts()
    .subscribe(data => this.postsData = data)
  }
}
Even though Angular APIs work hand in hand with Rx.js, Rx.js Observables do not know when the Angular component is no longer used. When the subscription remains active, it leads to memory leaks and potentially unexpected behavior or errors when trying to update the component.
To resolve the issue you need to manually unsubscribe from all the Observables after you've stopped using the component. This can be done using a variety of take operators.
export class AppComponent implements OnInit, OnDestroy {

  postsData!: Posts[];
  // Creating subject that will be used to unsubscribe
  private unsubscribe$ = new Subject<void>();

  constructor(private readonly service: PostsService) { }

  ngOnInit() {
    this.service.getAllPosts()
    .pipe(
      // Observable will remain active until this subject completes
      takeUntil(this.unsubscribe$)
    )
    .subscribe(data => this.postsData = data)
  }

  ngOnDestroy() {
    this.unsubscribe$.next();
    // Subject will complete when the component is destroyed
    this.unsubscribe$.complete();
  }

}
Async pipe is built into Angular that allows us to subscribe to Observables or resolve Promise directly in the template.
You need to subscribe within a component, assign the subscription data to a property, and manually unsubscribe.
export class AppComponent implements OnInit, OnDestroy {

  postsData!: Posts[];
  private unsubscribe$ = new Subject<void>();

  constructor(private readonly service: PostsService) { }

  ngOnInit() {
    this.service.getAllPosts()
    .pipe(
      takeUntil(this.unsubscribe$)
    )
    .subscribe(data => this.postsData = data)
  }

  ngOnDestroy() {
    this.unsubscribe$.next();
    this.unsubscribe$.complete();
  }

}
<div *ngFor="let post of postsData">
    {{ post.title }}
    </div>
You can assign Observable directly to the property and subscribe within the template. The Async pipe also automatically disposes (unsubscribes) the Observable when the component is no longer been used.
export class AppComponent implements OnInit {

  postsData$!: Observable<Posts[]>;

  constructor(private readonly service: PostsService) { }

  ngOnInit() {
    this.postsData$ = this.service.getAllPosts();
  }

}
<div *ngFor="let post of postsData$ | async">
    {{ post.title }}
</div>
When something changes in one component, Angular traverses the entire components tree to check if any of the components have changed. This is a default change-detection behavior and is super inefficient in projects with many components.
To combat this, the Angular team introduced OnPush change detection that rerenders a component only in these cases:
@Component({
  selector: 'app-root',
  templateUrl: './app.component.html',
  styleUrls: ['./app.component.scss'],
  changeDetection: ChangeDetectionStrategy.OnPush // <-- applying it
})
export class AppComponent implements OnInit {

  @Input() title: string = 'Default';

  updateTitle() {
    this.title = 'Updated';
  }

}
When you call the updateTitle() method on button click, instead of performing a deep check, Angular will only check this component and its children.
The OnPush change detection is more efficient because it reduces the number of checks, which leads to better performance and responsiveness.
This was just a small slice of everything that Angular has to offer. To learn more, be sure to check out my other articles.
Bye for now!
Author: