Author:


Whether you’re developing software or designing a distributed system, writing quality documentation is essential for long-term development and maintenance. This blog will introduce you to various tools and practices to enhance your documentation.
Documentation helps users understand how to use and develop software effectively. It accelerates the onboarding process by providing structured information about the product, system architecture, methodologies, and work practices. It also serves as the source of truth in analysis, planning, and future updates.

You’ve made a decision.
You have something in your mind you need to share. Crack the knuckles and start typing…, but how,
where? Using which tool?
I always picture the reader as someone who has little to no understanding of the subject. I try to use the terminology closest to them, draw examples in the real world that make sense, share as much useful information, and occasionally repeat myself.
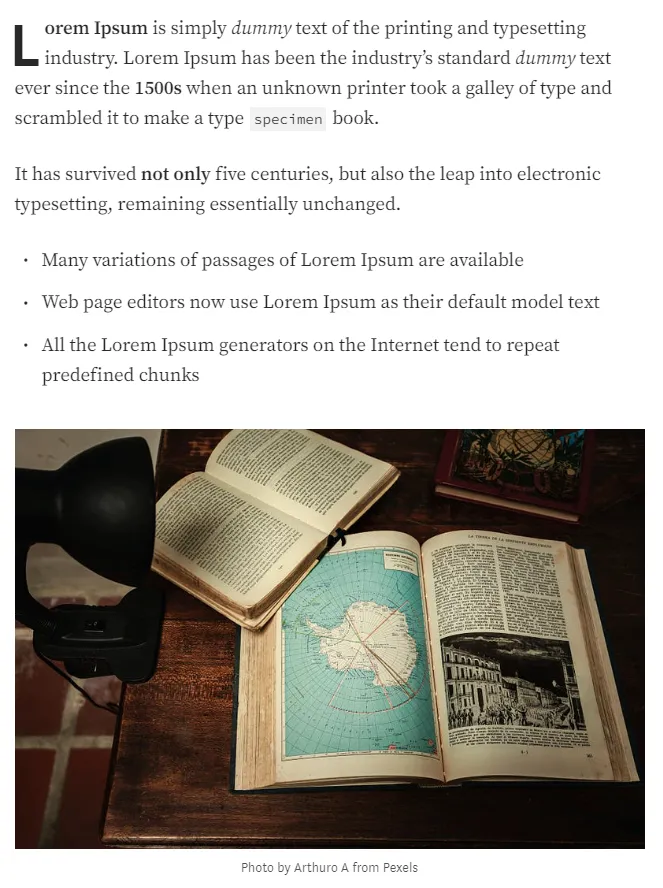
When it comes to software work, choose an editor that makes work easy to write and for users to consume. Use different fonts, colors, headings, bullet points, and blank spaces. Highlight important details, make comparisons, and occasionally display tables or images, e.g:
What You See Is What You Get (or simply WYSIWYG) is a type of editing software that allows users to see and edit content in a form that appears as it would when displayed on an interface, website, slide presentation, or printed document.
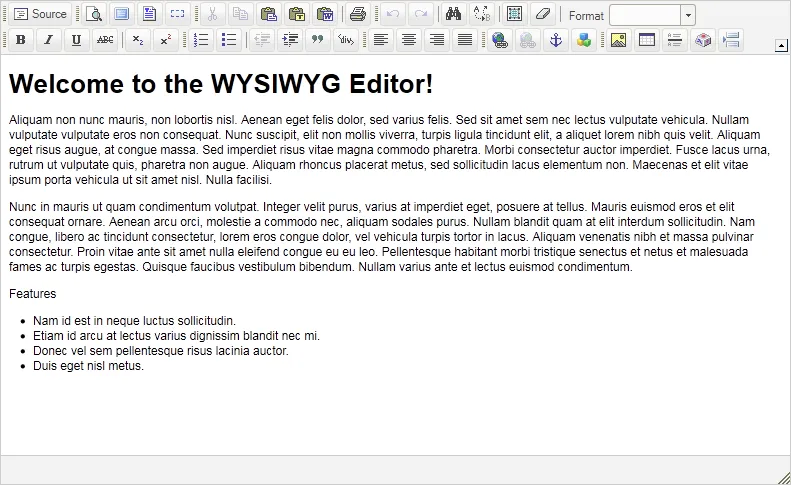
Writing is smooth and straightforward. Every text modification you need is set in the toolbar.
Markdown editors are a popular choice for writing technical documentation. Learn once, write anywhere as the syntax is the same no matter if you’re writing a readme file on Github, blog on The Practical Dev, or any other markdown template.
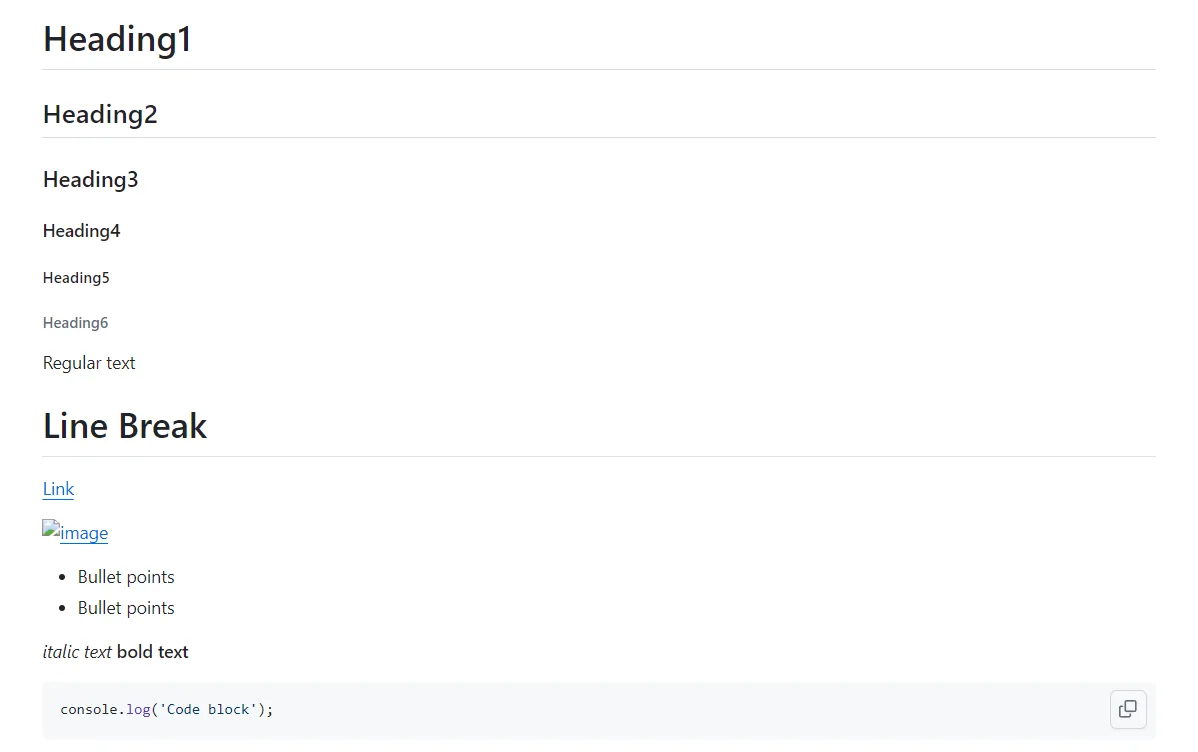
This base syntax works like this:
# Heading1
## Heading2
### Heading3
#### Heading4
##### Heading5
###### Heading6
Regular Text
# Line Break
[Link](URL)

* Bullet points
* Bullet points
*italic text*
**bold text**
```js
console.log('Code block');
```
Which translates into:
The writing is usually done inside IDE, like Visual Studio Code, Notepad++, Vim, etc, or online in any markdown editor.
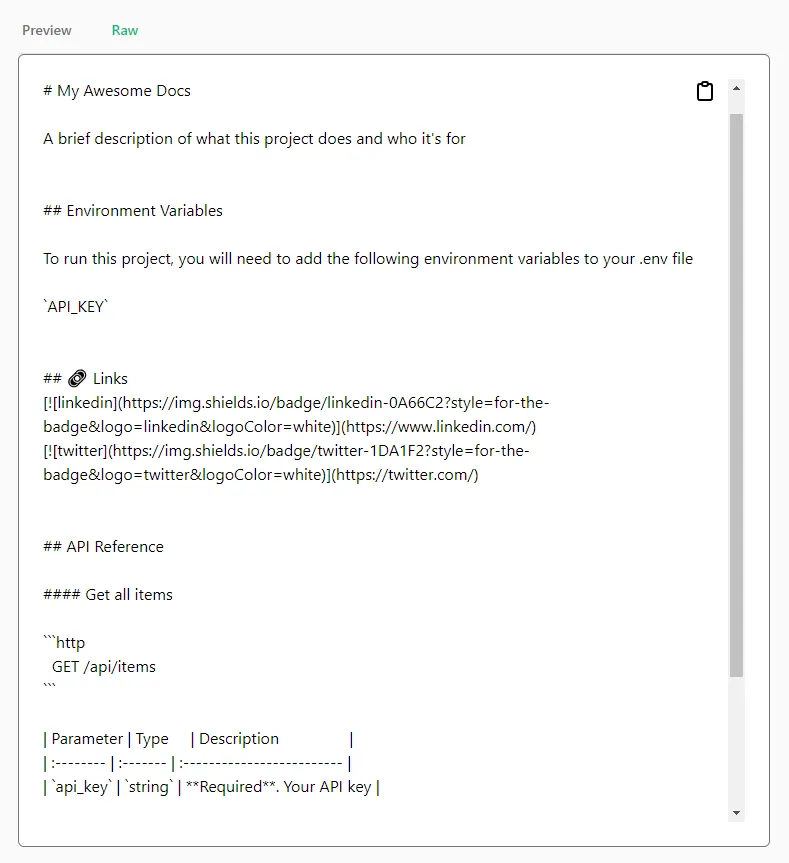
If writing code is an overhead for you, you’re in for a treat.
Using the app
Readme.so, you can generate a markdown for your
content just by clicking elements on the screen.
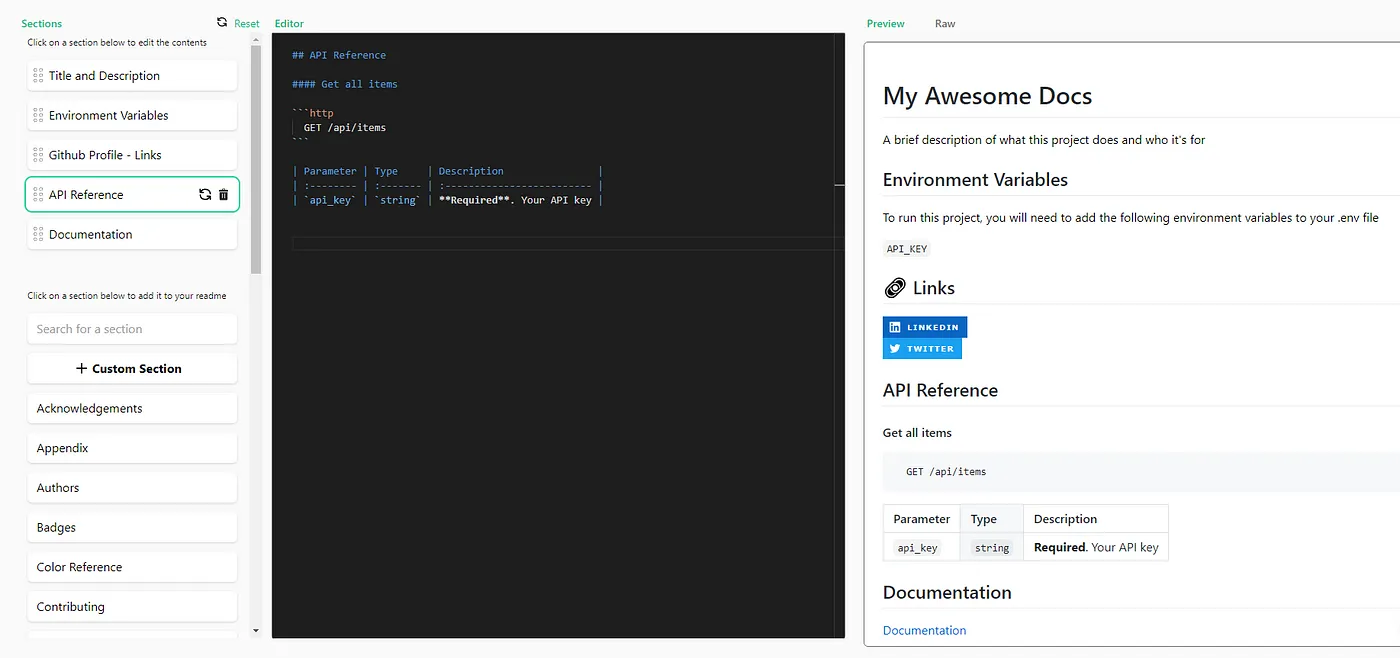
The output is a raw markdown that you can download and use in your docs.
There are templates online built using popular web frameworks that you can acquire that are specifically designed around docs.
You can always build the docs site yourself.

Writing quality documentation is more than just mashing the keyboard. Sometimes it’s better to draw a picture.
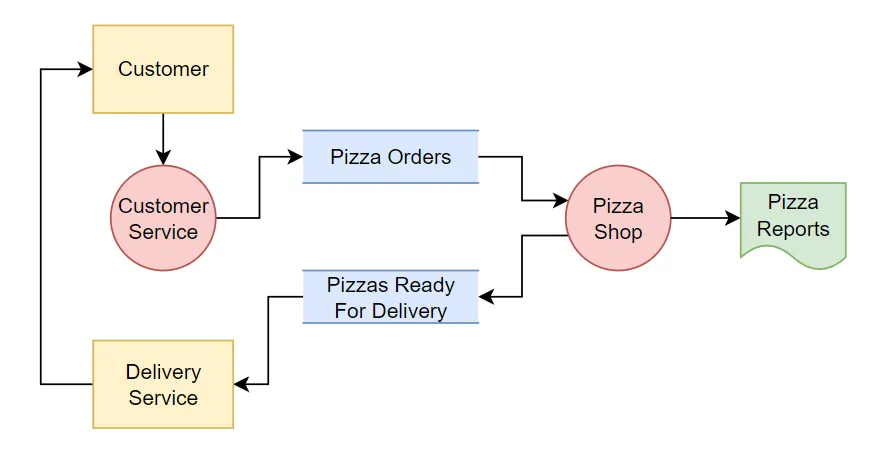
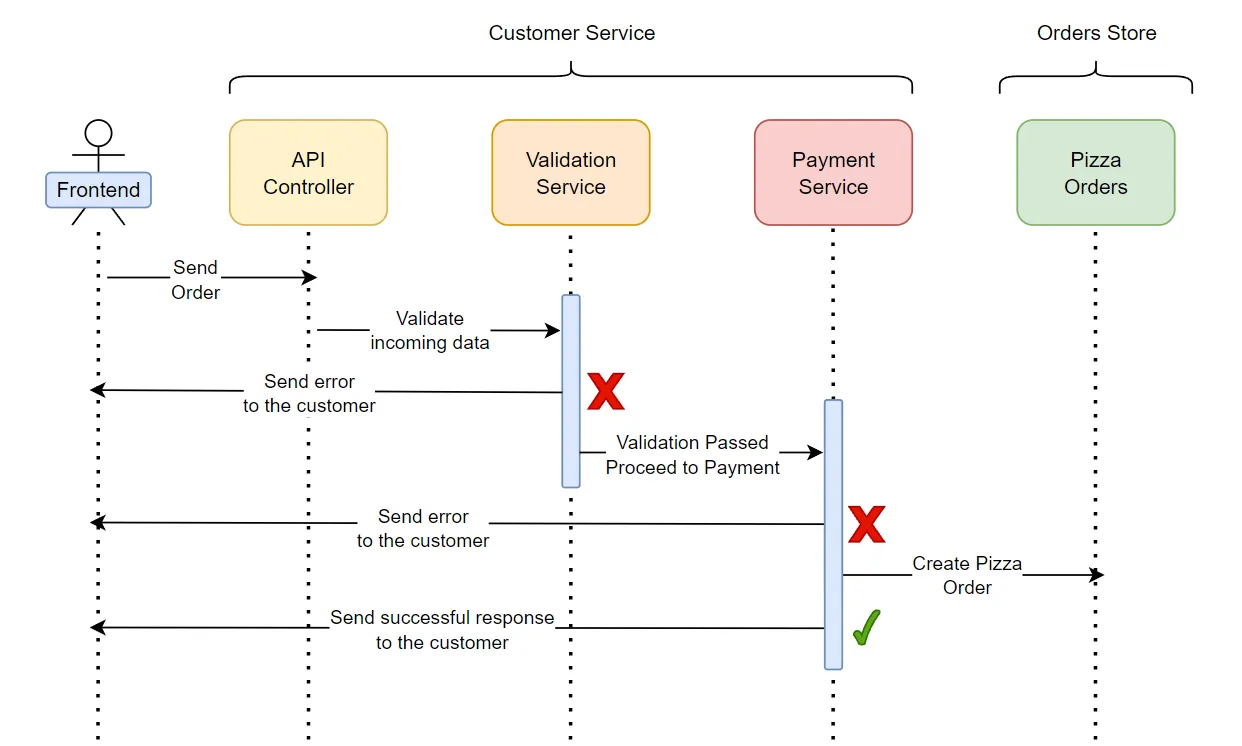
Diagrams and docs are a perfect fit as they’re used to showcase where a certain feature exists in the architecture, and how it works, transforms, and is consumed by other entities. Diagrams follow UML standards that are understood by developers, business analysts, and architects.
It’s a common practice to design an app using three-level diagrams:
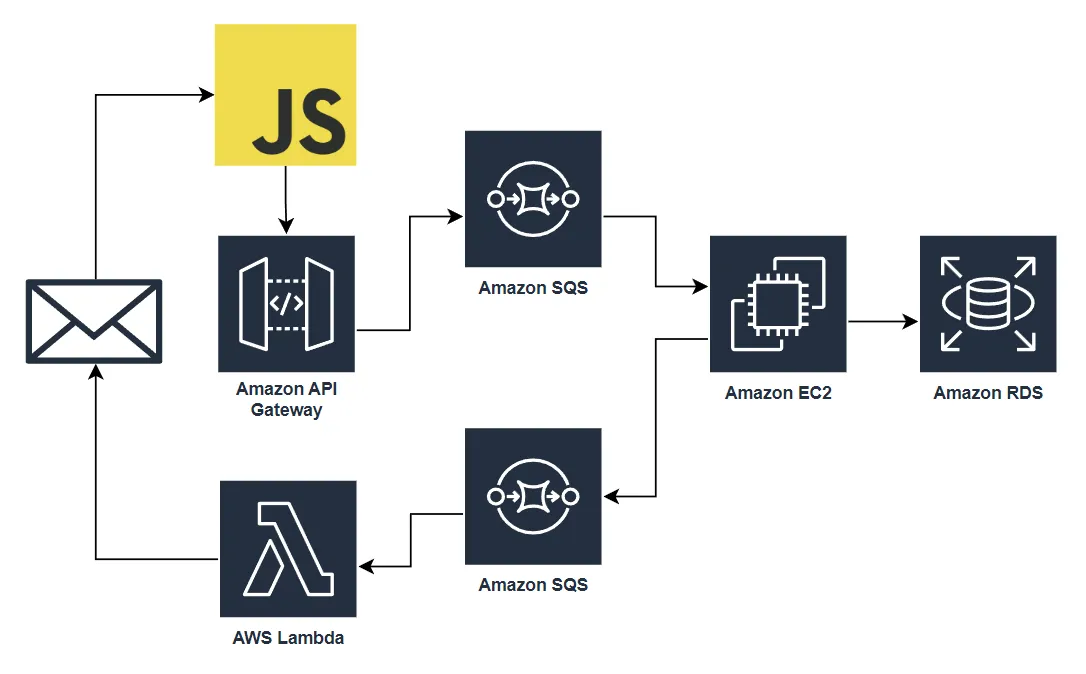
Besides drawing diagrams manually, you can use Diagrams as Code tools to generate architecture based on your code:

It’s a common practice to write comments in the code, to explain what a certain feature does or clarify why such implementation was needed. Using proper syntax, you can turn your comments into summaries.
In JavaScript, you can generate docs by simply typing /** and hitting enter. The Visual Studio Code then sets up a wrapper:
  /**
  *
  */
Inside you can describe your classes, interfaces, functions, their properties, and return types however you like.
Let’s say you created a function:
  export const exceptionHandler = (
    error: IHTTPError,
    req: Request,
    res: Response,
    _next: NextFunction
  ) => { }
If you hover over its name, you’re going to get very brief information about what it does.
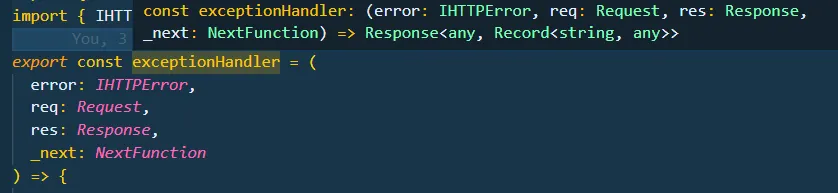
Now add comments using JSDoc syntax and once again hover over,
  /**
   * Global Exception Handler
   * @param {IHTTPError} error - Custom Error interface containing error name, status code, message and stack trace
   * @param {Request} req - Express request object
   * @param {Response} res - Express response object
   * @param {NextFunction} _next - Express next function
   * @returns HTTP error status code and appropriate message
   */
  export const exceptionHandler = (
    error: IHTTPError,
    req: Request,
    res: Response,
    _next: NextFunction
  ) => { }

This time around there are a lot more details. A similar feature can be found in other programming languages, like C#:
  [HttpGet("GetWeatherForecast")]
  public IEnumerable<WeatherForecast> Get(int ID) { }
If you write three slashes (///) on top of the method, Visual Studio / VSCode will automatically generate an XML comment summary for you to fill.
  /// <summary>
  /// Retrieves current weather
  /// </summary>
  /// <param name="ID">Item ID</param>
  /// <returns>List WeatherForecast</returns>
  /// <exception cref="System.Web.Http.HttpResponseException"></exception>
  [HttpGet("GetWeatherForecast")]
  public IEnumerable<WeatherForecast> Get(int ID) { }
The Typedoc package can generate markup documentation pages based on the JSDoc comments you type in your editor. To get started, install Typedoc in your TypeScript project:
> npm i typedoc
Open up a package.json file and add a script that will run Typedoc:
  "scripts": {
    "build": "tsc",
    "start": "...",
    "type-docs": "typedoc", // <-- Add this line
  },
Then create a tsconfig.json file and set the entry point array containing paths for the files you want to display in the generated docs and an output directory:
  {
    "compilerOptions": {...},
    "typedocOptions": {
      "entryPoints": [
        "src/shared/models/*.ts",
        "src/services/*.ts",
        ...
      ],
      "out": "docs/typedoc",  // <-- set up output directory
    }
  }
Run the script:
> npm run type-docs
The output is an HTML file that you can open up in the browser and browse through your functions, classes, and their properties.
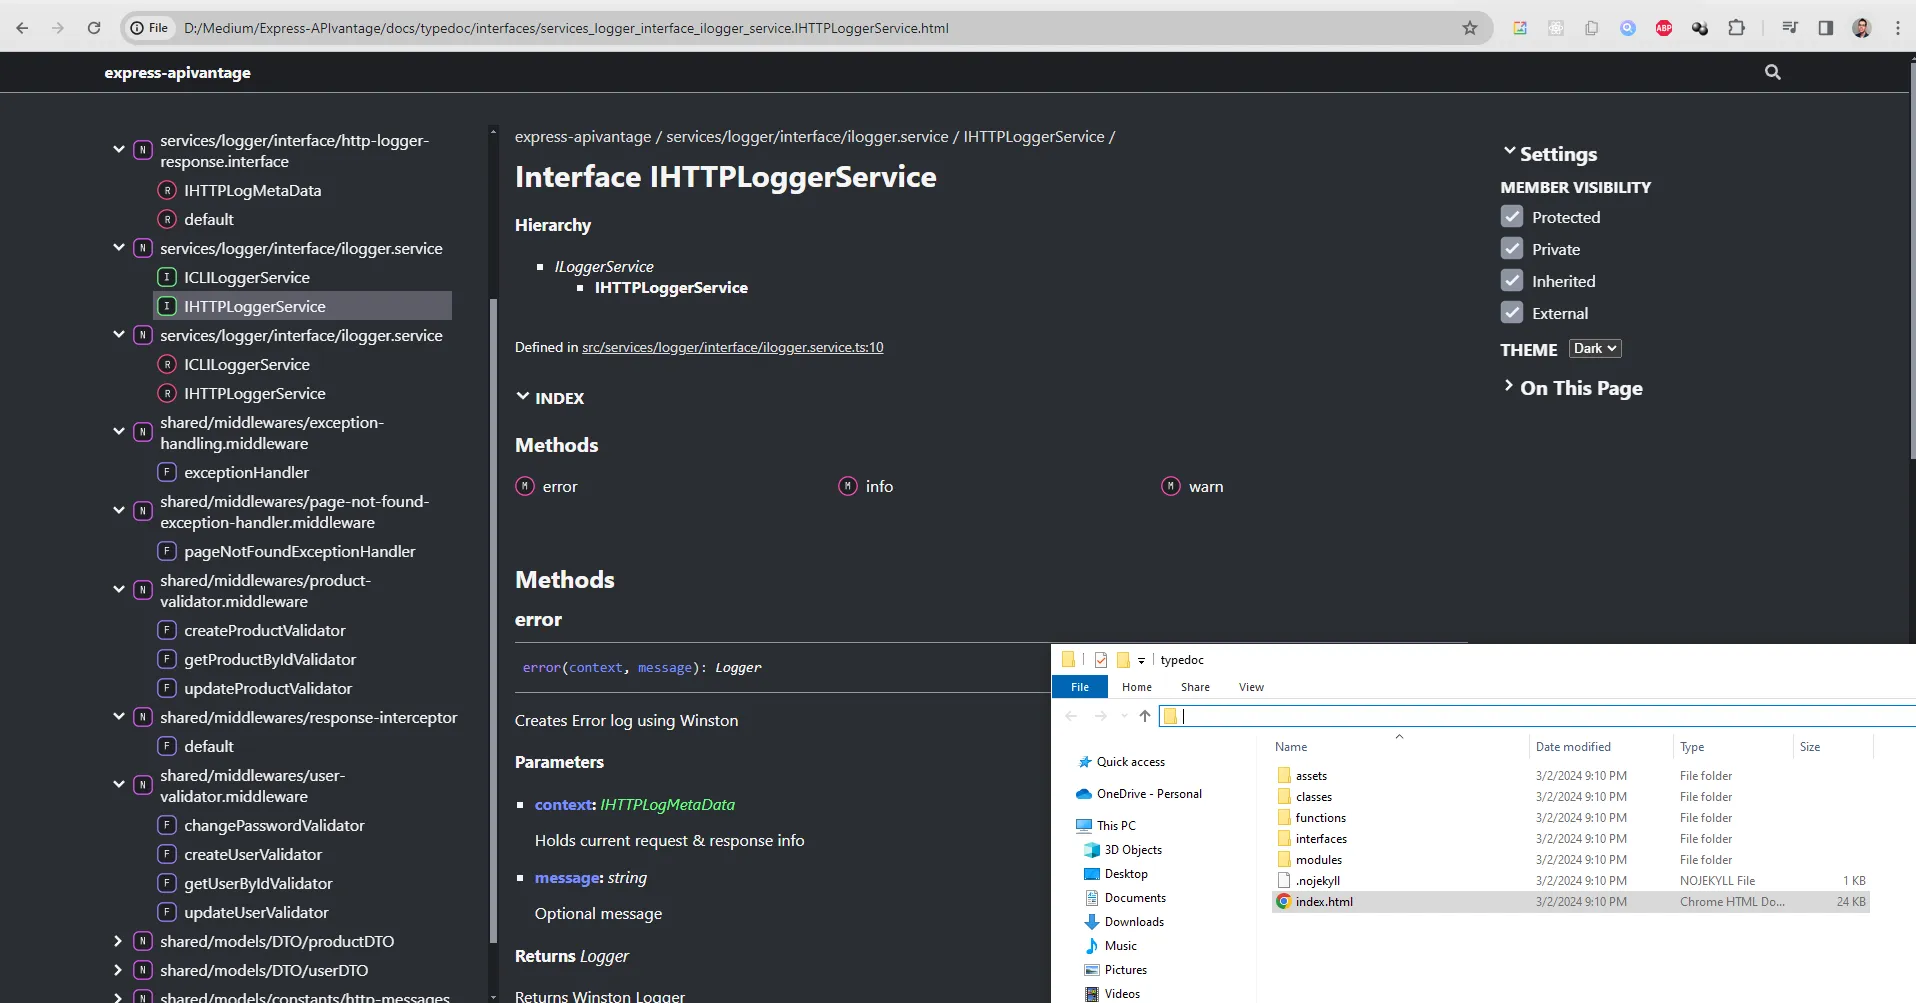
Learn more about Typedoc
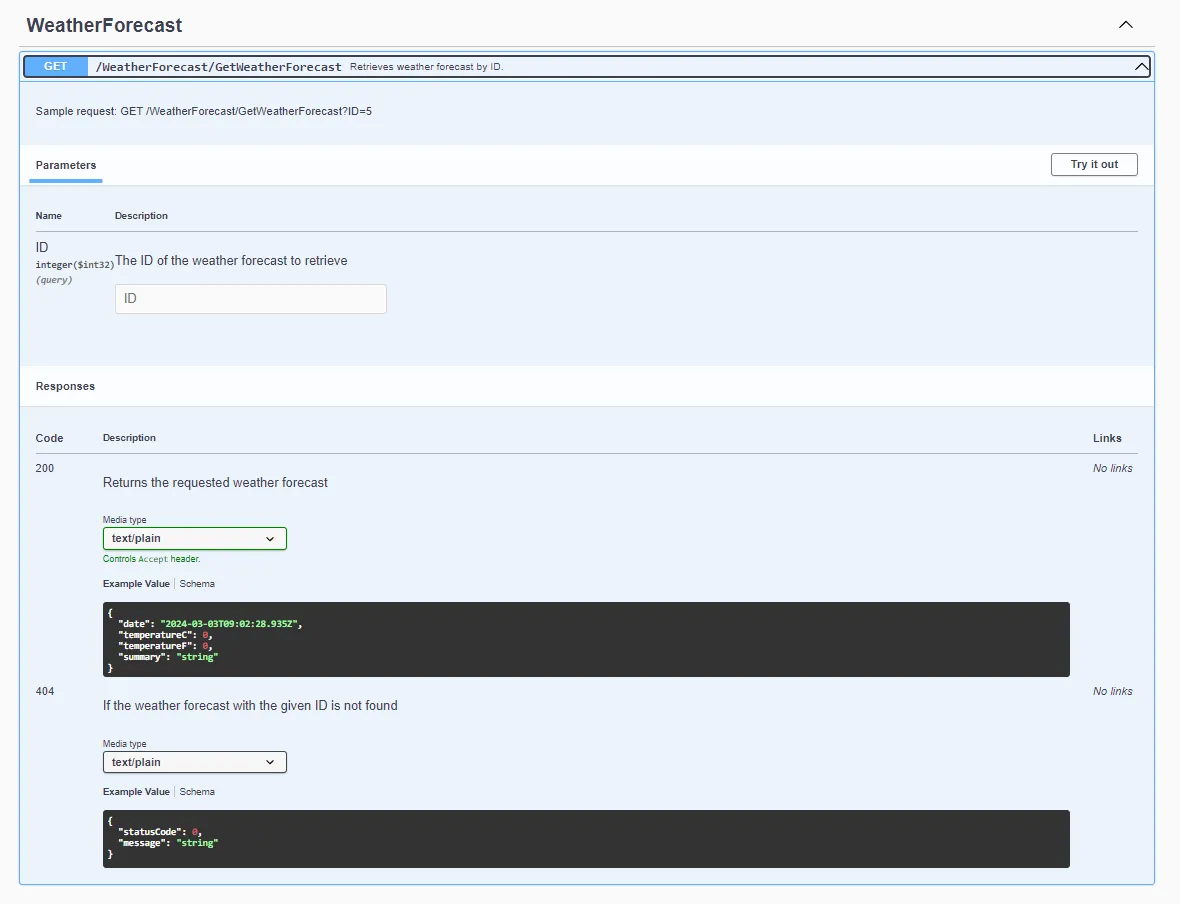
Swagger allows you to describe the structure of your APIs based on the Open API specification. Once again, you’re using code comments to generate documentation pages.
Using the Swashbuckle package for .NET Core (or Swagger-UI Express for Node.js), you can extend your APIs by generating Swagger docs based on your comments.
  // Program.cs

  var builder = WebApplication.CreateBuilder(args);
  //...

   builder.Services.AddSwaggerGen(options =>
   {
      options.SwaggerDoc("v1", new OpenApiInfo {
        Title = "Your Weather API",
        Description = "Weather API description",
        Version = "v1"
      });

     // Check "Documentation File" checkbox in project properties/build
     // and build the project.
     // This will generate <Your-Project>.xml inside Bin/Debug directory

     var fileName = Assembly.GetEntryAssembly().GetName().Name + ".xml";
     var filePath = Path.Combine(AppContext.BaseDirectory, fileName);
     options.IncludeXmlComments(filePath);
   });

   // Configure the HTTP request pipeline.
   if (app.Environment.IsDevelopment())
   {
      app.UseSwagger();
      app.UseSwaggerUI();
   }
  // comments on controller action

  /// <summary>
  /// Retrieves weather forecast by ID.
  /// </summary>
  /// <remarks>
  /// Sample request:
  ///     GET /WeatherForecast/GetWeatherForecast?ID=5
  /// </remarks>
  /// <param name="ID">The ID of the weather forecast to retrieve</param>
  /// <returns>The requested weather forecast</returns>
  /// <response code="200">Returns the requested weather forecast</response>
  /// <response code="404">If the weather forecast with the given ID is not found</response>
  /// <exception cref="System.Web.Http.HttpResponseException"></exception>
  [ProducesResponseType(typeof(WeatherForecast), StatusCodes.Status200OK)]
  [ProducesResponseType(typeof(WeatherForecastError), StatusCodes.Status404NotFound)]
  [HttpGet("GetWeatherForecast")]
  public IEnumerable<WeatherForecast> Get(int ID) { }
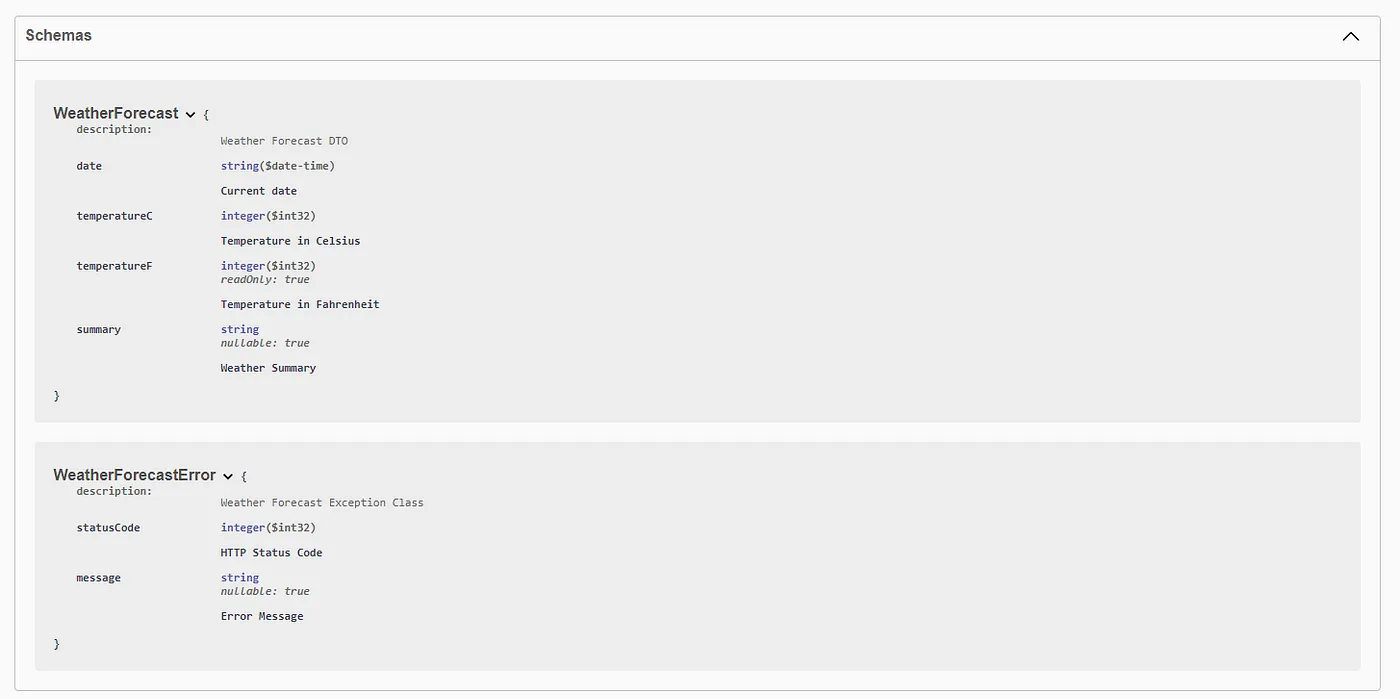
  // comments on classes

   /// <summary>
   /// Weather Forecast Exception Class
   /// </summary>
   class WeatherForecastError
   {
    /// <summary>
    /// HTTP Status Code
    /// </summary>
    public int StatusCode { get; set; }

    /// <summary>
    /// Error Message
    /// </summary>
    public string Message { get; set; }
   }

Detailed overview of the API actions.
Overview of models.
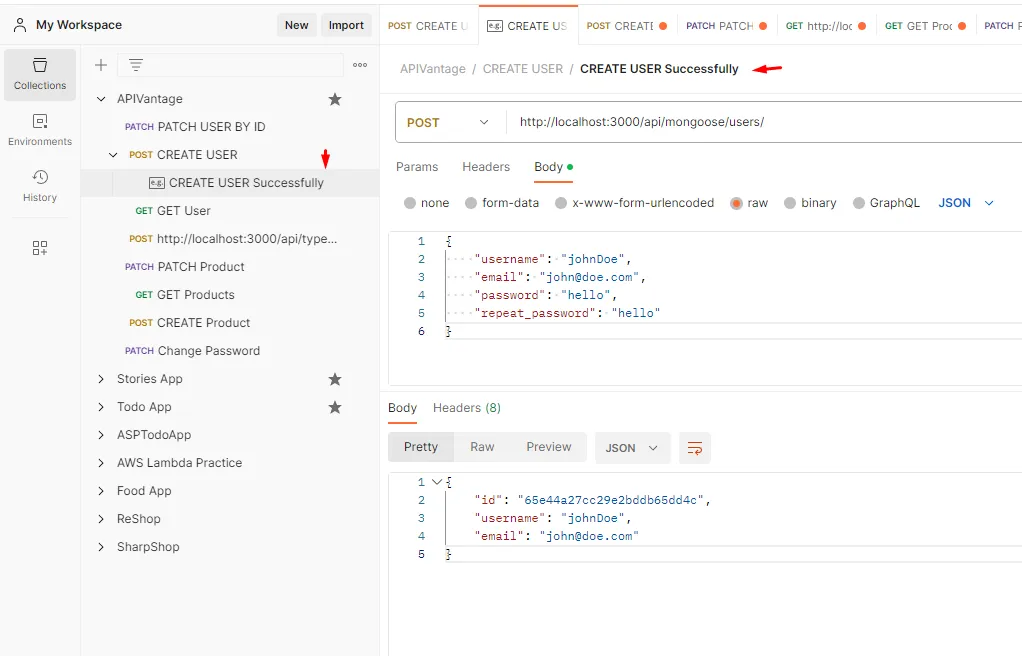
If you’re using Postman to test APIs, you may not be aware that Postman comes with built-in API documentation.
To get started, in your workspace, click on View more actions (three dots) and choose View documentation from the dropdown.
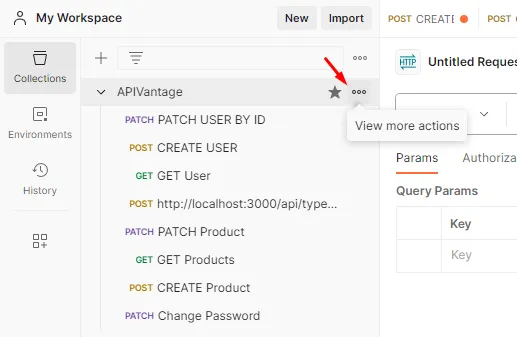
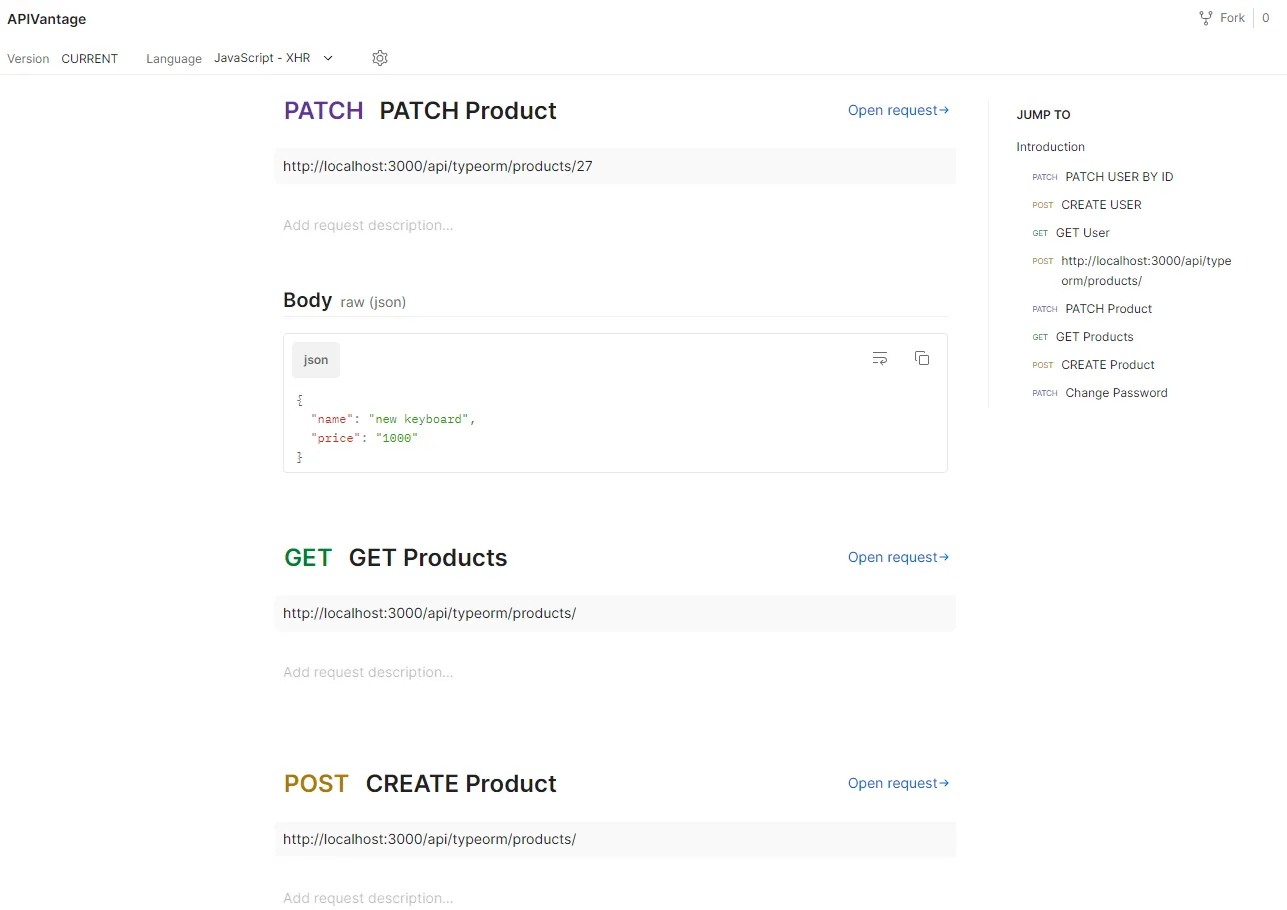
This opens a new window with an overview of each endpoint from the collection.
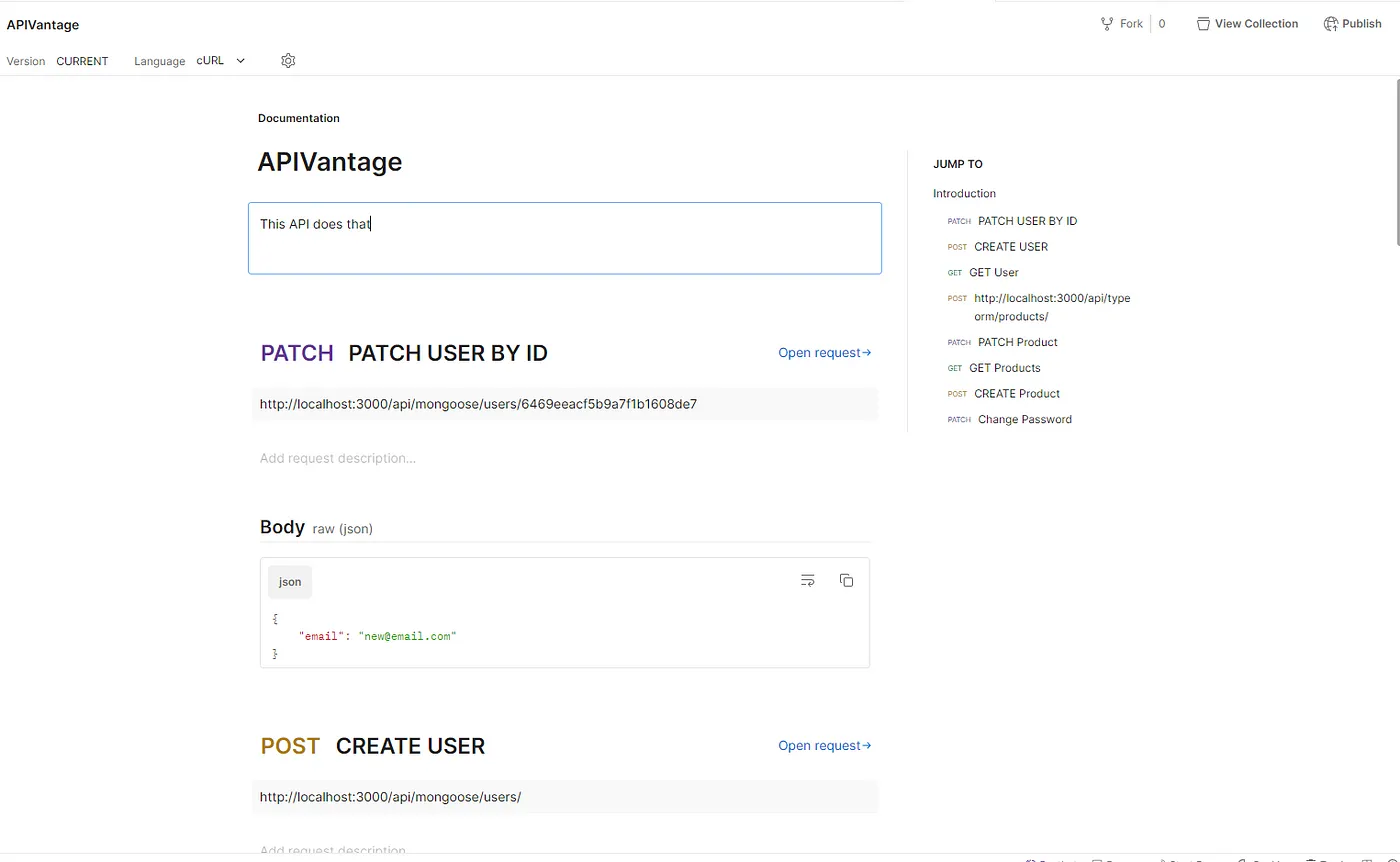
You can add more context to APIs by writing the description for a collection or each endpoint.
Choose an endpoint from your collection and send a request. Once you receive the response, click the Save Response button on the right.
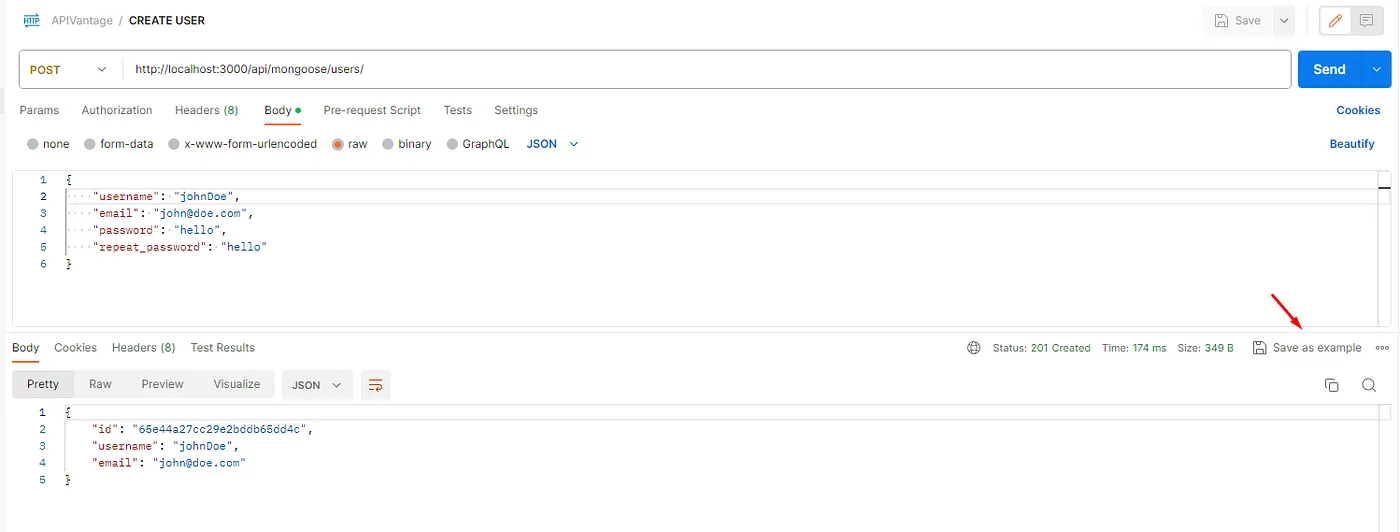
This saves an example to your collection that you can further edit.
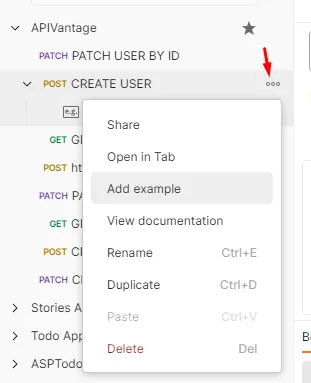
You can add more examples by clicking on the ellipsis menu (three dots) for the endpoint (by clicking on Add example).
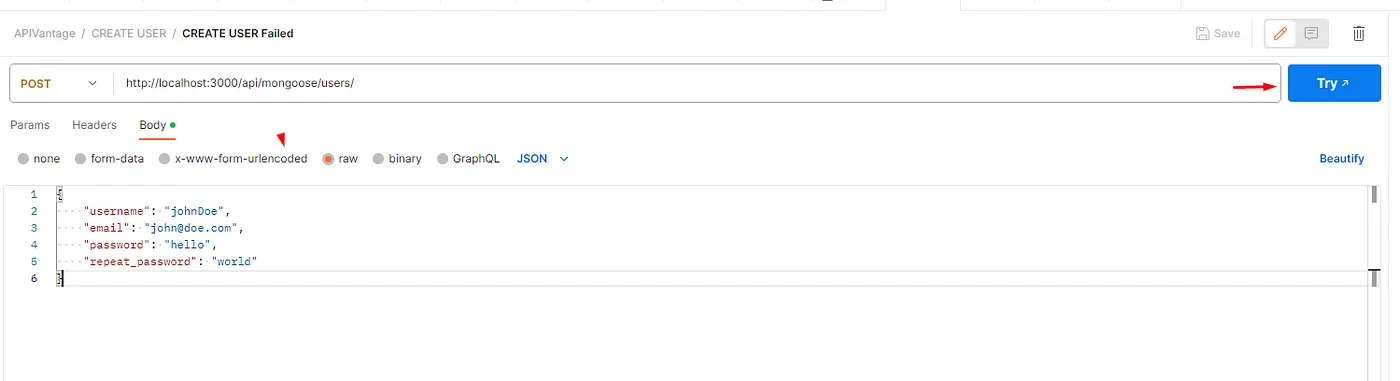
Make an example request and hit the Try button on the right and save the response.
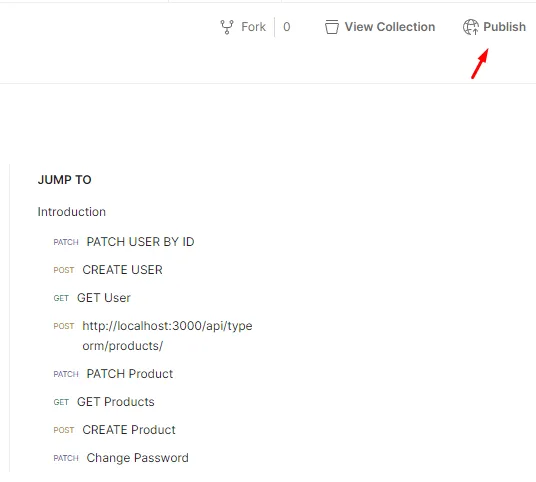
You can also publish your documentation online by clicking the Publish button in the top-right corner.

Create docs that users can interact with. Provide an engaging, user-friendly, and informative experience.
Increase the content interactivity. Add slides, tabs, pop-ups, expansion panels, buttons, inputs, etc.
Browsing through long docs can be tedious. Improve the user experience by implementing a search bar that enables users to quickly find relevant information by typing in keywords or phrases.
Collaborative editing features allow multiple users to use and edit the docs in real-time.
Documentation changes through the lifecycle of the project. Therefore, it’s a good idea to keep track of changes, knowing what was the original idea, what was changed, and when, etc.
Make instructional videos outlining and showcasing specific features or business policies.
Provide interactive code snippets or automation tests that users can run directly within the documentation to see the results and understand how certain features or functions work.
Storybook is a great example of this. You can showcase your reusable web components outside the app and test them in isolation.

It’s important to connect with the end user of your documentation. As mentioned before, there is a difference between drawing a picture for a product manager versus the developer. With this in mind, write docs that target groups with a specific level of business or technical understanding.
Refer your docs page to an existing Epic, User Story, or Bug as those give more context about why the change was needed.
If you’re implementing a feature and you’re worried that people on your team may not be familiar with the syntax, paste a link to the docs in the comment.
Have other team members review your work. Ask them if they can get around it, and what they’d change or improve.
As developers like to put technical details in the documentation, feel free to use markdown or libraries (e.g. highlight.js) to highlight code snippets and make them more readable.
The documentation should be frequently reviewed and revised.
Sometimes you forget how a certain feature works and you need a reminder. That’s what the documentation is for. So if you’re not writing docs, start now and if you are, take your time to get the quality right. Good documentation is a lifesaver, especially on big projects.
If you want to dive deeper, I recommend checking out the Learn More section below. And if you found this article useful give it a clap. Also, follow me on Medium, Twitter, and The Practical Dev to stay up to date with my content 👋
Author: