Author:

 Photo by Pixabay from Pexels - My own edit
This article will teach you how to add custom methods and properties
to built-in
JavaScript/TypeScript
classes using Prototype & Class-based inheritance and C# Extension Methods.
We are going to create three custom methods that can be applied to any type of collection, array, set, or map:
This is going to work similarly to Extension Methods in C#. Any consumer of the collection will be able to use these methods as well as the default ones.
The downside of the original implementation is that different collection types use different methods to interact with it. The things we're interested in are as follows:
So instead of needing to remember which property applies to which collection, we'll create custom unified methods that work for either.
Another important detail is the return type. If our custom method returns an existing collection it means that we can append other methods from that collection to it:
    const numbers = [1, 2, 3, 4, 5];

    numbers
      .map(number => number * 5)
      .tap()
      // array continues
      .filter(...)
But if the method returns a different value, we can no longer append a collection method to it.
    const numbers = [1, 2, 3, 4, 5];

    numbers
      .filter(number => number > 100)
      .isEmpty()
      // true or false
This is super easy to implement, and we'll see what it looks like with different paradigms, such as Prototype and Class-based inheritance, and in different programming languages.
The prototype is like a tree where all properties and methods on a certain object exist. For example, if we create an array, we can expand the prototype property to see all methods and properties available on the arrays.
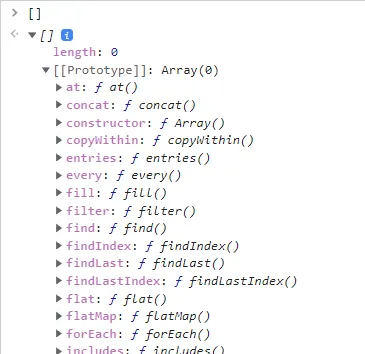
To add a new method to this prototype we'll do something like this:
    Class.prototype.nameOfTheMethod = function() {
        // do something
    }
The important thing to notice is that we're using a function statement as opposed to an array function. But why? - It's because we'll use this keyword within the function and this will refer to the consumer of the method.
    Array.prototype.nameOfTheMethod = function() {
        // do something
        console.log(this) // array
    }
We are going to use the same formula as above to extend each collection type (array, set, map) with each of our custom methods (isEmpty, insert, tap).
This method will check the length/size of the collection, and tell us whether it's empty or not.
    Array.prototype.isEmpty = function () {
        return this.length === 0;
    };

    Set.prototype.isEmpty = function () {
        return this.size === 0;
    };

    Map.prototype.isEmpty = function () {
        return this.size === 0;
    };
This method will push a new item into a collection.
    Array.prototype.insert = function (value) {
      this.push(value);
      return this;
    };

    Set.prototype.insert = function (value) {
      this.add(value);
      return this;
    };

    Map.prototype.insert = function (key, value) {
      this.set(key, value);
      return this;
    };
This is the part where I said that we'll have a unified solution. Because as we can see:
and now all three can use insert() to do the same thing for each.
The tap method will look through each element within an array and call our callback function. This callback function can be an action dispatcher function, console.log/warn/error, or any custom function.
    Array.prototype.tap = function (callback) {
        this.forEach(item => callback(item))
        return this;
    };

    Set.prototype.tap = function (callback) {
        this.forEach(item => callback(item))
        return this;
    };

    Map.prototype.tap = function (callback) {
        for (const [key, value] of this.entries()) {
          callback(key, value);
        }
        return this;
    };

    // this.entries() method returns an iterable of
    // key, value pairs for every entry in the Map.
Use case:
    const numbers = [1, 2, 3, 4, 5];

    numbers
      .tap((number) => {
        // some logic
      })
Now let's test each method. Since we extended the original prototype, we can call our new methods directly on the instances.
    const myArr = [];
    console.log(myArr.isEmpty()); // True

    myArr.insert('Hello');
    myArr.tap(console.log); // Hello
    console.log(myArr.isEmpty()); // False

    //

    const mySet = new Set();
    console.log(mySet.isEmpty()); // True

    mySet.insert('Hello');
    mySet.tap(console.log); // Hello
    console.log(mySet.isEmpty()); // False

    //

    const myMap = new Map();
    console.log(myMap.isEmpty()); // True

    myMap.insert('Hello', 'World');
    myMap.tap(console.log); // Hello World
    console.log(myMap.isEmpty()); // False
The basic premise will look like this. Our custom class will extend the base (Super) class.
    class SubClass extends SuperClass {
        constructor() {
          super();
        }
        method1() {
          this.doSomething // where this the instance of the class
        }
        method2() {
          //
        }
    }
Upon extending such classes it's also important to call super() within the constructor of a derived (Sub) class. This is necessary because a derived class inherits all of the properties and methods of its parent class, and the parent class may have its own constructor logic that needs to be executed in addition to the constructor logic of the derived class.
We're going to repeat this process for each of our target classes:
    class ExtendedArray extends Array {
        constructor() {
          super();
        }
        isEmpty() {
          return this.length === 0;
        }
        insert(value) {
          this.push(value);
          return this;
        }
        tap(callback) {
          this.forEach(item => callback(item))
          return this;
        }
    }
    class ExtendedSet extends Set {
        constructor() {
          super();
        }
        isEmpty() {
          return this.size === 0;
        }
        insert(value) {
          this.add(value);
          return this;
        }
        tap(callback) {
          this.forEach(item => callback(item))
          return this;
        }
    }
    class ExtendedMap extends Map {
        constructor() {
          super();
        }
        isEmpty() {
          return this.size === 0;
        }
        insert(key, value) {
          this.set(key, value);
          return this;
        }
        tap(callback) {
          for (const [key, value] of this.entries()) {
            callback(key, value);
          }
          return this;
        }
    }
To test this we'll need to create a new instance of each of our custom classes as opposed to working with core classes (which we did previously).
We'll push a new item into a collection using our insert method, inspect the collection using the tap method and then check if the collection is empty, using the isEmpty method.
        const myArr = new ExtendedArray();
        console.log(myArr.isEmpty()); // True

        myArr.insert('Hello')
        myArr.tap(console.log); // Hello
        console.log(myArr.isEmpty()); // False

        //

        const mySet = new ExtendedSet();
        console.log(mySet.isEmpty()); // True

        mySet.insert('Hello')
        mySet.tap(console.log); // Hello
        console.log(mySet.isEmpty()); // False

        //

        const myMap = new ExtendedMap();
        console.log(myMap.isEmpty()); // True

        myMap.insert('Hello', 'World')
        myMap.tap(console.log); // Hello World
        console.log(myMap.isEmpty()); // False
And it worked. Now we can use these newly created methods whenever we're working with these types of collections. Let's learn how to put this together in TypeScript as well.

On the TypeScript side things will be mostly similar to those in JavaScript with a few extra steps.
To apply similar class-based logic in the world of TypeScript we need to add generic types to TypeScript classes.
    class ExtendedArray<T> extends Array<T> {
        constructor() {  // where T is type of data included in an array,
          super(); // e.g. string, number, custom class, etc.
        }
        isEmpty() {
          return this.length === 0;
        }
        insert(value: T) {
          this.push(value);
          return this;
        }
        tap(callback: (item: T) => void) {
          this.forEach(item => callback(item))
          return this;
        }
    }
    class ExtendedMap<K, V> extends Map<K, V> {
        constructor() { // where K, V are generic types used when inserting data
          super(); // e.g. (string, string), (number, string), etc.
        }
        isEmpty() {
          return this.size === 0;
        }
        insert(key: K, value: V) {
          this.set(key, value)
          return this;
        }
        tap(callback: (key: K, value: V) => void) {
          for (const [key, value] of this.entries()) {
            callback(key, value);
          }
          return this;
        }
    }
To reassure that this once again works we're going to test it the same way.
    const myArr = new ExtendedArray<string>(); // where T is string
    console.log(myArr.isEmpty()); // True

    myArr.insert('Hello')
    myArr.tap(console.log); // Hello
    console.log(myArr.isEmpty()); // False

    //

    const mySet = new ExtendedSet<string>(); // where T is string
    console.log(mySet.isEmpty()); // True

    mySet.insert('Hello')
    mySet.tap(console.log); // Hello
    console.log(mySet.isEmpty()); // False

    //

    const myMap = new ExtendedMap<string, string>(); // where K,V are strings
    console.log(myMap.isEmpty()); // True

    myMap.insert('Hello', 'World')
    myMap.tap(console.log); // Hello World
    console.log(myMap.isEmpty()); // False
In order for Prototypes to work with TypeScript we need to add additional functionalities. Here is why.
If we attempt to extend the Array prototype the same way we did in JavaScript, the TypeScript compiler will complain that the isEmpty method does not exist on the type of array.
    Array.prototype.isEmpty = function () {
        return this.length === 0;
    };

    // Property 'isEmpty' does not exist on type 'any[]'.ts(2339)
To overcome this issue we need to create a type declaration file (d.ts) where we'll specify rules for the types we'll use. Basically, we'll create the isEmpty method for each type.
Learn more about type declaration files.
    // index.d.ts file
    export {};

    declare global {
      interface Array<T> { // where T is once again type included in an array
        isEmpty(): boolean;
        insert(value: T): this
        tap(callback: (item: T) => void): this
      // callback type is function that takes argument and returns void
      }
    }

    declare global {
      interface Set<T> {
        isEmpty(): boolean;
        insert(value: T): this
      // returning 'this' means we can append methods after it
        tap(callback: (item: T) => void): this
      }
    }

    declare global {
      interface Map<K, V> {
        isEmpty(): boolean;
        insert(key: K, value: V): this
        tap(callback: (key: K, value: V) => void): this
      // here callback takes two arguments to print key and value
      }
    }
With this in place at the root of our project, we can create index.ts file and extend each prototype. Note we do not import a d.ts file.
    // index.ts or any other .ts file

    Array.prototype.isEmpty = function () {
      return this.length === 0;
    };

    Array.prototype.insert = function<T>(value: T) {
      this.push(value);
      return this;
    };

    Array.prototype.tap = function<T>(callback: (item: T) => void) {
      this.forEach((item: T) => callback(item))
      return this;
    };

    //

    Set.prototype.isEmpty = function () {
      return this.size === 0;
    };

    Set.prototype.insert = function<T>(value: T) {
      this.add(value);
      return this;
    };

    Set.prototype.tap = function<T>(callback: (item: T) => void) {
      this.forEach((item: T) => callback(item))
      return this;
    };

    //

    Map.prototype.isEmpty = function () {
      return this.size === 0;
    };

    Map.prototype.insert = function<K, V>(key: K, value: V) {
      this.set(key, value);
      return this;
    };

    Map.prototype.tap = function<K, V>(callback: (key: K, value: V) => void) {
      for (const [key, value] of this.entries()) {
        callback(key, value);
      }
      return this;
    };
Putting this to the test we should get the same results.
    const myArr = [];
    console.log(myArr.isEmpty()); // True

    myArr.insert('Hello');
    myArr.tap(console.log); // Hello
    console.log(myArr.isEmpty()); // False

    //

    const mySet = new Set();
    console.log(mySet.isEmpty()); // True

    mySet.insert('Hello');
    mySet.tap(console.log); // Hello
    console.log(mySet.isEmpty()); // False

    //

    const myMap = new Map();
    console.log(myMap.isEmpty()); // True

    myMap.insert('Hello', 'World');
    myMap.tap(console.log); // Hello World
    console.log(myMap.isEmpty()); // False

Sometimes we want to add functionality to a code from a third-party library in the codebase and use it frequently, but we do not want to learn all the methods and properties the library exposes.
Essentially we could create an abstraction for the library we're using so that the consumer/developer can use a method without knowing what it does under the hood, and which libraries it calls.
Let's set up a famous JavaScript date library - Day.js , in the project.
    > npm init -y
    ...
    > npm install dayjs
We'll make use of the relative time plugin built into Day.js to get the offset between desired and current date.
    const dayjs = require('dayjs');
    const relativeTime = require('dayjs/plugin/relativeTime');
    dayjs.extend(relativeTime);
We'll extend the JavaScript Date class with our custom method (getDateOffset) that abstracts the call to relative time in Day.js.
    Date.prototype.getDateOffset = function() {
        return dayjs().to(dayjs(this));
    }
This is basically adding an additional feature to the Date class in JavaScript. Let's test our method.
    const dateInThePast = new Date();
    dateInThePast.setDate(dateInThePast.getDate() - 10);
    console.log(dateInThePast.getDateOffset()) // 10 days ago

    var dateInTheFuture = new Date();
    dateInTheFuture.setDate(dateInTheFuture.getDate() + 10);
    console.log(dateInTheFuture.getDateOffset()); // in 10 days
To achieve this trick in C#, be sure to use Humanizer Nugget Package. If you want to learn more about Day.js, be sure to read my article: The complete guide to Day.js.

We mentioned C# on several occasions in the article so we might as well add some input here too.
To extend the core classes as we did with the prototype in JavaScript, we'll make use of C# Extension methods. The core idea is similar, we create a custom class with a custom method (extension) that will do the job we tell it.
    public static class Utils
    {
     public static string TheMethod (this string TheText)
     {
      return TheText.something();
     }
A few things to keep in mind:
With this in place, we import our Utils class in the file where we wish to use the extension and apply it;
    using Utils;
    ...
    string name = "Player 1";

    name.TheMethod(); // watch the magic happen
Now let's apply this pattern to our three custom extensions.
It's important to note here that, C# also supports class-based inheritance, as we did before.
We'll start by creating an extension method. The beauty of C# collections, is that they all implement the IEnumerable interface. You've might have encountered something like this before.
If we create a method that returns IEnumarable, it won't really matter whether the method is returning Array, List, or HashSet (JavaScript Set); in either of those cases the compiler won't complain.
    public IEnumerable<string> TheMethod() {
        return new string[0];
    }

    public IEnumerable<string> TheMethod2() {
        return new List<string>();
    }

    public IEnumerable<string> TheMethod3() {
        return new HashSet<string>();
    }

    public IEnumerable<string> TheMethod4() {
        return new Stack<string>();
    }

    public IEnumerable<string> TheMethod5() {
        return new Queue<string>();
    }
It works with Dictionaries (JavaScript Map) too, as long as we proceed with
KeyValuePair<K, V>, because IEnumerable excepts a single (wrapper) type.
    public IEnumerable<KeyValuePair<string, string>> TheMethod() {
        return new Dictionary<string, string>();
    }
Back to our example. The isEmpty method will work with collections, so the parameter passed to our extension method will be of type IEnumerable<T>. We then call .Any() method on the desired collection. This returns true or false whether the collection is empty or not.
    public static class Utils
    {
     public static bool IsEmpty<T>(this IEnumerable<T> collection)
     {
      return collection != null && !collection.Any();
      // .Any() method is available on all IEnumerables
     }
    }
Let's put this to the test:
    using System;
    using System.Collections.Generic;
    using System.Linq;
    using Utils;

    public class Program
    {
     public static void Main()
     {
         string[] myArr = new string[0];
         Console.WriteLine(myArr.IsEmpty()); // True

         myArr = new string[5]; // array of Nulls
         Console.WriteLine(myArr.IsEmpty()); // False

          //

         var myList = new List<string>();
         Console.WriteLine(myList.IsEmpty()); // True

         myList.Add("Hello");
         Console.WriteLine(myList.IsEmpty()); // False

          //

         var myDict = new Dictionary<string, string>();
         Console.WriteLine(myDict.IsEmpty()); // True

         myDict.Add("Hello", "World");
         Console.WriteLine(myDict.IsEmpty()); // False
     }
    }
Passed with flying colors.
For this method - we're going to use Stack and List classes.
Here, we won't be using IEnumerable, as we cannot insert data into IEnumerable. Instead, we'll use create and override a method that can work with List<T> and Stack<T>.
    public static class Utils
    {

        public static List<T> Insert<T>(this List<T> list, T item)
        {
            list.Add(item); // adds item to the list
            return list;
        }

        public static Stack<T> Insert<T>(this Stack<T> stack, T item)
        {
            stack.Push(item); // pushes item to the stack
            return stack;
        }
    }
The consumer of either class can now use the insert method, without knowing the underlying implementation.
    var existingStories = new List<string>();
    existingStories.Insert("Destructuring JS");
    existingStories.Insert("Day.js");
    existingStories.Insert("CMD");

    Console.WriteLine(string.Join(", ", existingStories));

    var upcoming = new Stack<string>();
    upcoming.Insert("Express JS");
    upcoming.Insert("Angular");
    upcoming.Insert("Rx.js");

    Console.WriteLine(string.Join(", ", upcoming));
To create a callback function in C#, we'll make use of the Action<T> delegate. Here we'll use a List and HashSet (that is equivalent to a Set collection in Java/JavaScript).
    public static class Utils
    {
        public static IEnumerable<T> Tap<T>
        (
          this IEnumerable<T> collection,
          Action<T> callback
        )
        {
            foreach (T item in collection)
            {
                callback(item);
            }
            return collection;
        }
    }
Now let's test this:
    using System;
    using System.Collections.Generic;
    using Utils;

    public class Program
    {
     public static void Main()
     {

      HashSet mySet = new HashSet { 1, 2, 3 };
      mySet.Tap(Console.WriteLine); // 1, 2, 3

      List myList = new List { 1, 2, 3 };
      myList.Tap(Console.WriteLine); // 1, 2, 3
     }
    }
This can be applied to dictionaries too:
    public static class Utils
    {

        public static Dictionary Tap
        (
          this Dictionary dictionary,
          Action callback
        )
        {
            foreach (KeyValuePair kvp in dictionary)
            {
                callback(kvp.Key, kvp.Value);
            }
            return dictionary;
        }
    }
    using System;
    using System.Collections.Generic;
    using Utils;

    public class Program
    {
     public static void Main()
     {
      Dictionary myDictionary = new Dictionary {
       { "foo", 1 },
       { "bar", 2 },
       { "baz", 3 }
      };

      myDictionary.Tap((key, value) =>
        Console.WriteLine($"Key: {key}, Value: {value}"));

      /*
        Key: foo, Value: 1
        Key: bar, Value: 2
        Key: baz, Value: 3
      */
     }
    }
 Photo by Skitterphoto from Pexels
If I have not convinced you to use extensions thus far and this should put a pin to it. Using the methods we created above we'll create an empty array and add items to it.
    const colleciton = new Array();
    colleciton
      .insert(1)
      .insert(5)
      .insert(3)
      .insert(5)
      .tap(console.log);

    // 1, 5, 3, 5
Now let's swap an Array class with a Set class.
    const colleciton = new Set();
    colleciton
      .insert(1)
      .insert(5)
      .insert(3)
      .insert(5)
      .tap(console.log);

    // 1, 5, 3
And everything works as expected with zero code changes. The difference in the output is that the Set collection returns only unique elements.
 Photo by Monstera from Pexels
Let's talk about potential issues with creating custom extensions:
#1
The first thing to be aware of is that we need to have all consumers of the extension
be on board with the extension method they're calling. For example, if we're using
List<T> in C# and I want to combine it with Stack<T>, we can only use
methods
within extensions that are available in both.
And if the two do not share a common language then we can implement one method for each
class<T> as we did above for the insert method.
#2
Future language changes. If we add a custom method in code and the same method is introduced by the core language team (JS/C#) in the feature, it may create ambiguity that leads to broken code.
#3
Another danger of creating custom prototypes is that we can break code that relies on the default behavior of built-in objects. For example, if we modify the String.prototype object to add a custom method, any code that relies on the default behavior of the String object could be affected and potentially break.
Similarly with the Extension Methods in C#. If the name of the extension method conflicts with an existing property, it could cause unexpected behavior or errors.
Extensions are a fun way to introduce new features, abstract implementation, and create unified solutions, but may cause issues if used recklessly.
Author: